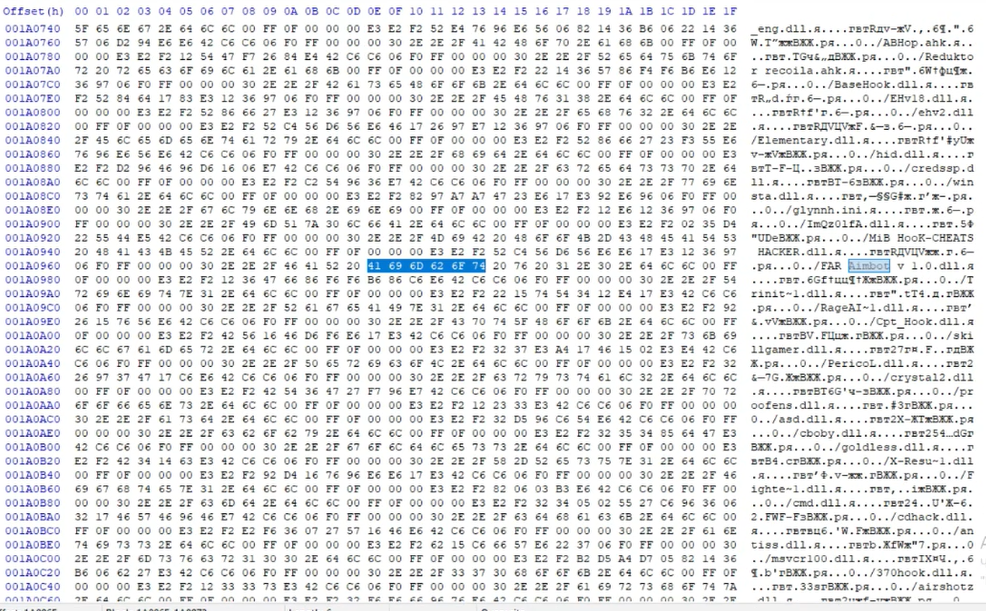
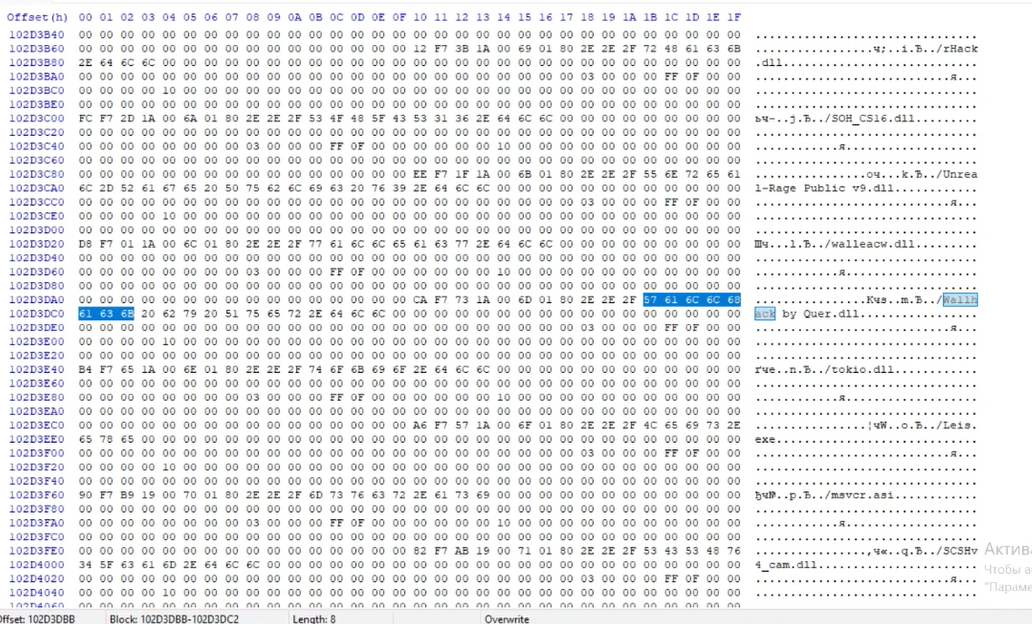
Microsoft always bundles unwanted apps with Windows, whether it’s Windows 10 or 11. While some of these apps and services can be easily deleted, others simply stay with your Windows installation until you manually remove them. Even if these apps don’t always bother you, it is always a good idea to debloat Windows because debloating OS can help you in many ways.
Removing these unwanted apps and services will free up your disk space, make your computer run faster, and make your system smoother and faster overall, making it much more user-friendly and comfortable to use. Decluttering Windows will always help your computer run better, and that’s a fact! Just like some amazing facts you didn’t know about Microsoft and Windows.
If you’ve read the blog this far, you’re now ready to debloat Windows and make your PC / laptop run smoother and better. Here are several ways to do it!
How to Debloat Windows when Installing
Every time you create a Windows installation media and install a new copy of Windows 10/11, you will find that all the bloatware apps and services are pre-installed, which complicates the whole process of debloating Windows, as you now have to use multiple apps or command line programs to debloat Windows. While that’s not a bad idea, some of these apps not only allow you to declutter Windows but also offer a number of features that improve your user experience.
However, if you’re someone who wants to use a clean and bloatware-free Windows from the get-go without doing much, there’s still a way to do it. When you install a new version of Windows, you should follow these steps:
If you come to this screen when reinstalling Windows, you must select English(World) in the Time and Currency format dialog box.
Image: ThioJoe
Then, proceed with the installation process as you would for a normal Windows installation.
Once the installation is complete, you will be greeted with the error message OOBEREGION. Just press the Skip button at the bottom and continue your Windows installation.
Image: ThioJoe
Once you’re in Windows, you’ll see that your computer is free of bloatware.
That’s it. You’ve successfully removed all the junk from Windows.
Before you continue your journey, keep one thing in mind: after this trick, you won’t be able to use the Microsoft Store, but there’s a solution for that, too.
Just open the Settings app.
Go to the settings for Time & Language
Then click on Language & Region.
Under the Region section, you will see that “World” is selected as the country or region.
Change the setting to your specific region.
After that, the Microsoft Store should work without any problems.
Note:
This trick works for the current version of Windows 11, but Microsoft might fix this in the upcoming version of Windows 11.
This is the perfect way to debloat Windows from the start. After this process, you will be left with only the most important Windows services and apps that are required for Windows to run smoothly. This trick is great if you’re installing Windows for the first time or setting up a new device. But if you want to debloat Windows without having to deal with reinstalling Windows, the next steps should be enough for you.
Debloat Windows by removing the Microsoft Apps
Removing unnecessary apps and services is another matter. What if you are someone who never uses Microsoft apps like Clipchamp and Microsoft Calendar and considers them bloatware? Bloatware refers to apps and services that come pre-installed on your device that you know you’ll never use. Removing these apps is fine as long as you do not remove apps or services that are essential to the functioning of the OS.
How do you know which apps to remove and which to keep? The answer is quite simple: if you only want to remove Microsoft apps that you consider useless for your purposes, we recommend sticking to apps that can be deleted directly either from the Start menu or from Windows Settings and not touching any app that cannot be deleted directly. This way, you’ll delete all the apps that you consider useless, and your computer will continue to work properly.
Debloat Windows using Windows 10 Debloater
Windows 10 Debloater is a powerful tool that works on both Windows 10 and Windows 11. It’s a user-friendly tool because you don’t have to run any scripts in the command prompt to use it. However, remember that before using this tool, you should always create a Windows restore point first because if something goes wrong, you can always come back to it. You can learn how to create a System Restore Point in our blog. Once you’ve created a system restore point, it’s time to get started with Windows 10 Debloater and debloat Windows.
https://github.com/Sycnex/Windows10Debloater
First, we need to download and install Windows 10 Debloater to use it. Once you have downloaded the zip file, follow the steps below to use it.
Download the zip file to your desired location and unzip it.
Now open the folder and locate the Powershell file, right-click on it, and select Run with PowerShell.
It may take some time for it to open, but it will.
Note:
You need to run the PowerShell as an administrator.
Once the app opens, you will see a user interface like the following. Follow the steps below to debloat Windows:
Go to DEBLOAT OPTIONS and click on CUSTOMISE BLOCKLIST.
A window will open, listing all the apps and services installed on your computer.
Here, you need to select all the apps that you want to remove.
Once you have selected all the apps you want to remove, simply click on the box below which says Save Custom Allowlist and Blocklist.
Close the respective window and go to DEBLOAT OPTIONS.
Here, click on the third box marked REMOVE BLOATWARE AND CUSTOM BLOCKLIST.
Now, wait until the process is complete because depending on the number of selected apps, it may take a few seconds to a few minutes.
Note:
We recommend that you do not remove apps that say Non-removable in the front, as they might be system apps that are important for OS to work.
Once you have removed all the junk with Windows 10 Debloater, we recommend you do a few more things to achieve an even better result.
Related Read: How to Speed Up Your Slow Laptop
Disable TELEMETRY/TASKS
Windows 10 Debloater is a powerful tool that not only helps you debloat Windows but also disables things like Microsoft’s tracking services. This is a crucial benefit because once these services are disabled, Windows’ performance will increase a bit, and you’ll have the peace of mind that Microsoft is no longer tracking your activities.
To disable TELEMETRY / TASKS with Windows 10 Debloater, follow these steps:
Open Windows 10 Debloater.
At the very bottom of the app, you will find the section OTHER CHANGES FIXES.
Click here on DISABLE TELEMETRY / TASKS.
This will disable all tracking services in Windows 10/11.
Disable Cortana
Microsoft knows that no one uses Cortana, so they removed it in Windows 11. We don’t think Cortana is bloatware, but everyone has their preferences, and Cortana doesn’t do much anyway. So why not just remove it and debloat Windows? The Windows 10 Debloater tool will help you remove Cortana from Windows 10 as well:
Open Windows 10 Debloater
And go to the CORTANA section.
Click here DISABLE, and voila, Cortana is gone for good.
You can also click ENABLE to bring her back if you want, but please don’t do that.
Once you have removed all the junk and disabled tracking services, reboot your computer to make all the changes you made permanent.
Other Apps/ Utilities to Debloat Windows
There are a variety of apps and command line programs to debloat Windows, and each program has its own features that differentiate it from the others. In this blog, we have introduced the simplest program to remove bloatware from Windows (Windows 10 Debloater). But many popular apps can do much more than just declutter Windows 10/11 if you consider yourself an advanced Windows user and know your way around things like scripting. Here are 2 really powerful tools I recommend you use:
Windows Toolbox from Chris Titus Tech (PAID)
Windows Toolbox is a paid utility that helps users to debloat Windows, but decluttering is not the only thing this tool can do. There are several things that you will appreciate after using this Windows Toolbox. We will only mention some of the features that this toolbox offers, but if you want to know more about this utility, you can visit cttstore.com to learn more about it.
That brings us to the great features that make this toolbox so special:
This toolbox works like Nanite on steroids. You can use it to download multiple apps at once, and all the apps are organized into categories, which makes it much easier to use.
The tool also has a tweak section that offers features like adding an ultimate performance profile, disabling Storage Sense, and automatically running Disk Cleanup.
The tool also lets you restore some old Windows panels like Power Panel and Network Connection.
All these features are just the tip of the iceberg. Once you use the app, you will learn how useful and extensive its features are. If you want to take control of your Windows computer, this app is worth a try.
ThioJoe’s PowerShell script
If you’re into scripting and programming and don’t want to install a GUI-based Windows utility, Youtuber Thio Joe has a solution for you. He has developed a Windows PowerShell script that lets you view all the apps and services installed on your computer directly in PowerShell. Also, from there, you can uninstall any service or app that you don’t want on your system.
This tool is also suitable for advanced users who are familiar with PowerShell and Command Prompt. It is a well-made utility designed specifically for debloating Windows. You can check out the utility on ThioJoe’s Github.
FAQs on Debloating Windows
1. What is the best way to Debloat Windows?
The best way to debloat Windows is to install it without bloatware using the first method. But if you want to debloat Windows while using your computer normally, you can try the Windows 10 Debloater tool because it is easy to use and lets you debloat Windows without any problems.
2. Is it important to make a Windows Restore point before debloating Windows 10/11?
Yes, it is important to create a Windows restore point if you try to debloat Windows with one of these apps’ Windows utilities because that way, you can access your system again in case something happens to the OS or you accidentally delete a file that is important for OS to work.
3. Should I disable One Drive with the help of Windows 10 Debloater?
If you are doing a fresh Windows installation and don’t have any data in OneDrive, you can remove it, but we don’t recommend it if you are already using your PC /laptop and trying to debloat Windows for the first time. One Drive may contain some of your data and documents as it is used for this purpose by default in Windows 10 and 11.